Range Rover Evoque: Engine Oil Draining and Filling, Camshafts
Engine Oil Draining and Filling
Draining
NOTE: Removal steps in this procedure may contain installation details.
1. WARNING: Make sure to support the vehicle with axle stands. Raise and support the vehicle.
2. Remove the engine undershield.
Refer to: Engine Undershield (501-02 Front End Body Panels, Removal and Installation).
3. Remove the oil filter.
Refer to: Oil Filter Element (303-01B Engine - GTDi 2.0L Petrol, Removal and Installation).
4. WARNING: Avoid skin contact with the specified material.
CAUTIONS:
Hot fluid.
Be prepared to collect escaping fluids.
NOTE: Remove and discard the sealing washer.
- Torque: 20 Nm

Filling
NOTE: Removal steps in this procedure may contain installation details.
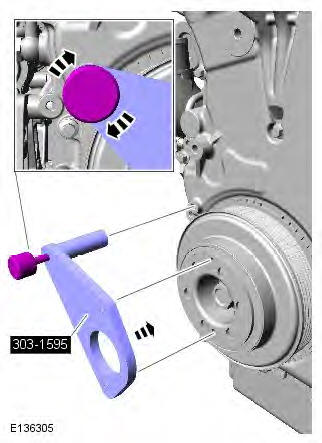
1. CAUTIONS:
Make sure that the component is clean, free of foreign material and lubricant.
Make sure that new sealing washers are installed.
To install, reverse the removal procedure.
2. Check and top-up the engine oil.
Camshafts
Special Tool(s)
 JLR-303-1600
Locking Tool, Camshaft
Removal
NOTES:
Some illustrations may show the engine removed for clarity.
Removal steps in this procedure may contain installation details.
Some variation in the illustrations may occur, but the essential information is always correct.
1. Refer to: Specifications (414-01 Battery, Mounting and Cables, Specifications).
2. WARNING: Make sure to support the vehicle with axle stands. Raise and support the vehicle.
3. Refer to: Timing Chain (303-01B Engine - GTDi 2.0L Petrol, Removal and Installation).
4. CAUTION: Note the fitted position of the component prior to removal.

5.
- Loosen each bolt 2 turns at a time until all bolts are removed.

6. Remove the special tool.
Special Tool(s): JLR-303-1600

7. CAUTION: Note the fitted position of the component prior to removal.

8. CAUTION: Note the fitted position of the component prior to removal.

Installation
1. CAUTION: Make sure that these components are installed to the noted removal position.
NOTE: Lubricate the camshafts and the camshaft bearing caps with oil meeting Land Rover specification prior to installation.

2. CAUTION: Apply sealant WSK-M2G348-A2 in a 1-1.5mm diameter on the cylinder head and camshaft caps as shown. The components must be installed and tightened within 60 minutes of sealant application.

3. CAUTIONS:
Make sure that the camshafts and camshaft bearing caps are installed in their original locations.
Make sure that the piston No. 1 is at top dead center (TDC) before installing the camshafts.
Torque:
- Stage 1: 7 Nm
- Stage 2: 16 Nm

4. Torque: 10 Nm

5. Refer to: Timing Chain (303-01B Engine - GTDi 2.0L Petrol, Removal and Installation).
6. Refer to: Battery (414-01 Battery, Mounting and Cables, Removal and Installation).
Crankshaft Front Seal
Special Tool(s)
 308-511
Installer, Transmission Output Shaft Seal
Removal
NOTES:
Some illustrations may show the engine removed for clarity.
Some variation in the illustrations may occur, but the essential information is always correct.
1. Refer to: Crankshaft Pulley (303-01B Engine - GTDi 2.0L Petrol, Removal and Installation).
2. NOTE: Using a suitable tool, remove the oil seal.

Installation
1. Special Tool(s): 308-511

2. Refer to: Crankshaft Pulley (303-01B Engine - GTDi 2.0L Petrol, Removal and Installation).
Crankshaft Pulley
Special Tool(s)
 JLR-303-1594
Locking Tool, Driveplate
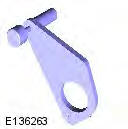 JLR-303-1595
Alignment Tool, Crankshaft Damper
 JLR-303-1600
Locking Tool, Camshaft
Removal
NOTES:
Some variation in the illustrations may occur, but the essential information is always correct.
Some illustrations may show the engine removed for clarity.
Removal steps in this procedure may contain installation details.
1. Refer to: Specifications (414-01 Battery, Mounting and Cables, Specifications).
2. WARNING: Make sure to support the vehicle with axle stands. Raise and support the vehicle.
3. Refer to: Accessory Drive Belt (303-05B Accessory Drive - GTDi 2.0L Petrol, Removal and Installation).
4. Refer to: Starter Motor (303-06B Starting System - GTDi 2.0L Petrol, Removal and Installation).
5. Refer to: Valve Cover (303-01B Engine - GTDi 2.0L Petrol, Removal and Installation).
6.

7.

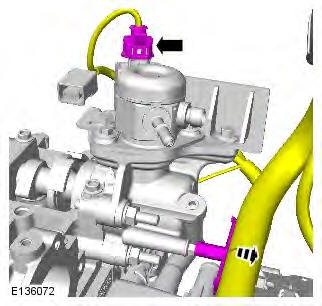
8. WARNING: Do not smoke or carry lighted tobacco or open flame of any type when working on or near any fuel related components. Highly flammable mixtures are always present and may ignite. Failure to follow these instructions may result in personal injury.
CAUTION: Make sure that all openings are sealed.
Use new blanking caps.

9.
10.
11.
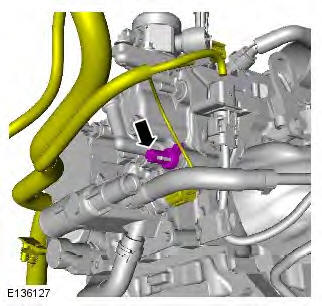
- Carefully remove and discard the oil seal.

12. CAUTION: Discard the fuel pipe.

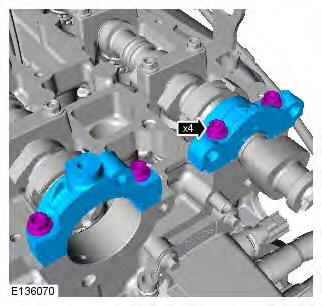
13. CAUTION: During removal, care must be taken to avoid dropping the high pressure fuel pump tappet.
- Carefully remove and discard the oil seal.

14.
15.

16. Rotate the engine until the trigger wheel gap and camshafts are positioned as shown.

17. CAUTIONS:
The special tool must only be used to align the crankshaft timing.
Align the two locating dowels and install the special tool to the crankshaft damper. Install the pin into the engine front cover. Special Tool(s): JLR-303-1595

18. Rotate the engine clockwise until the camshafts are positioned as illustrated.

19. Install the special tool.
Special Tool(s): JLR-303-1600

20. Install the special tool.
Special Tool(s): JLR-303-1594

21. Remove the special tool.
Special Tool(s): JLR-303-1595

23. CAUTION: The crankshaft damper bolt and washer cannot be reused.

Installation
1. CAUTIONS:
Only tighten the bolt finger-tight at this stage.
Make sure that the mating faces are clean and free of foreign material.
NOTE: Apply WSS-M2C913-B or WSS-M2C913-C oil on the damper sealing surface prior to installation.

2. Install the special tool.
3. Torque:
- Stage 1: 100 Nm
- Stage 2: 90

