Range Rover Evoque: Wipers and Washers - Removal and Installation
Windshield Wiper Motor
Removal
NOTE: Removal steps in this procedure may contain installation details.
1. Refer to: Plenum Chamber (412-01 Climate Control, Removal and Installation).
2. NOTE: LHD illustration shown, RHD is similar.
Torque: 8 Nm

Installation
1. To install, reverse the removal procedure.
Rear Window Wiper Motor
Removal
NOTE: Removal steps in this procedure may contain installation details.
1. Refer to: Rear Window Wiper Pivot Arm (501-16 Wipers and Washers, Removal and Installation).
2. Torque: 7 Nm

3. Torque: 10 Nm

Installation
1. To install, reverse the removal procedure.
Rain Sensor
Removal
NOTE: Removal steps in this procedure may contain installation details.
1. Refer to: Interior Rear View Mirror (501-09 Rear View Mirrors, Removal and Installation).
2.

Installation
1. To install, reverse the removal procedure.
Headlamp Washer Jet
Removal
NOTE: Removal steps in this procedure may contain installation details.
1. WARNING: Make sure to support the vehicle with axle stands. Raise and support the vehicle.
2. Refer to: Front Bumper Cover (501-19 Bumpers, Removal and Installation).
3. NOTE: The step must be carried out on both sides.
Torque: 4.5 Nm

4. NOTE: The step must be carried out on both sides. Torque: 4.5 Nm

5. Torque: 4.5 Nm

6. NOTE: LH illustration shown, RH is similar.

7. NOTE: Do not disassemble further if the component is removed for access only.

Installation
1. To install, reverse the removal procedure.
Wiper Pivot Arm
Removal
NOTES:
RHD illustration shown, LHD is similar.
Removal steps in this procedure may contain installation details.
1. Torque: 25 Nm

2. NOTE: Do not disassemble further if the component is removed for access only.

Installation
1. To install, reverse the removal procedure.

Windshield Washer Pump
Removal
NOTE: Removal steps in this procedure may contain installation details.
1. WARNING: Make sure to support the vehicle with axle stands. Raise and support the vehicle.
2. Remove the front RH wheel arch liner.
Refer to: Fender Splash Shield (501-02 Front End Body Panels, Removal and Installation).
3. CAUTION: Be prepared to collect escaping fluids.

Installation
1. To install, reverse the removal procedure.
Windshield Washer Reservoir
Installation
1. WARNING: Make sure to support the vehicle with axle stands. Raise and support the vehicle.
2. Refer to: Front Bumper Cover (501-19 Bumpers, Removal and Installation).
3. Torque: 5 Nm

4. Torque: 5 Nm

5. Torque: 5 Nm

6. CAUTION: Be prepared to collect escaping fluids.

Installation
1. To install, reverse the removal procedure.
Headlamp Washer Pump
Removal
1. WARNING: Make sure to support the vehicle with axle stands. Raise and support the vehicle.
2. Remove the front RH wheel arch liner.
Refer to: Fender Splash Shield (501-02 Front End Body Panels, Removal and Installation).
3. CAUTION: Be prepared to collect escaping fluids.

Installation
1. To install, reverse the removal procedure.
Rear Window Wiper Pivot Arm
Removal
NOTE: Removal steps in this procedure may contain installation details.
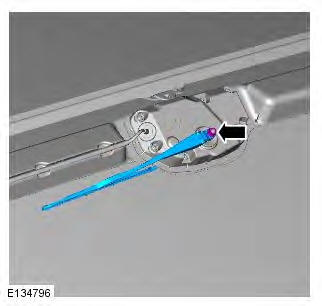
1. Open the tailgate.
2. Torque: 10 Nm

3. NOTE: Make sure that the component is installed to the noted removal position. Torque: 7 Nm

4. NOTE: Do not disassemble further if the component is removed for access only. Remove the rear window wiper blade.

Installation
1. To install, reverse the removal procedure.
Wiper Pivot Arm
Removal
NOTES:
RHD illustration shown, LHD is similar.
Removal steps in this procedure may contain installation details.
1. Torque: 25 Nm

2. NOTE: Do not disassemble further if the component is removed for access only.

Installation
1. To install, reverse the removal procedure.

Wipers and Washers
Principle of Operation
The wiper and washer system is controlled by the Central Junction Box (CJB). All wiper functions for the front and rear wipers are controlled from a multi-function wash/wipe switch assembly located on the steering column.
Inspection and Verification
CAUTION: Diagnosis by substitution from a donor vehicle is NOT acceptable. Substitution of control modules does not guarantee confirmation of a fault and may also cause additional faults in the vehicle being checked and/or the donor vehicle.
NOTE: Check and rectify basic faults before beginning diagnostic routines involving pinpoint tests.
1. Verify the customer concern.
2. Visually inspect for obvious signs of mechanical or electrical faults.
Visual inspection

3. If an obvious cause for an observed or reported concern is found, correct the cause (if possible) before proceeding to the next step
4. Use the approved diagnostic system or a scan tool to retrieve any diagnostic trouble codes (DTCs) before moving onto the symptom chart or DTC index.
- Because the DTCs are stored in more than one module, a complete vehicle read is recommended
- Make sure that all DTCs are cleared following rectification
Symptom chart


DTC index
For a complete list of all diagnostic trouble codes that could be logged on this vehicle, please refer to section 100-00.

