Range Rover Evoque: Wheel Knuckle
Special Tool(s)
 205-857
Remover, Halfshaft
 JLR-204-804
Lever, Wheel Knuckle
Removal
CAUTIONS:
Nuts and bolts must be tightened with the weight of the vehicle on the suspension.
Do not allow halfshafts to hang unsupported at one end or joint damage will occur.
Make sure the halfshaft constant velocity (CV) joints do not over articulate. Failure to follow this instruction may result in damage to the CV joints.
Angularly adjusted roller (AAR) joints, used at the inboard end of some halfshafts have no internal retaining mechanism and can separate.
NOTE: If a new knuckle is installed a new wheel bearing must be installed.
All vehicles
1. Connect the diagnostic tool and set the electronic park brake (EPB) to the maintenance position.
2. WARNING: Make sure to support the vehicle with axle stands. Raise and support the vehicle.
3. Refer to: Wheel and Tire (204-04 Wheels and Tires, Removal and Installation).
4. CAUTIONS:
Do not use air tools to remove the nut.
Discard the nut.

5. NOTE: All wheel drive transmission illustrations shown, front wheel drive transmission is similar.

6.

7. NOTE: All wheel drive transmission illustrations shown, front wheel drive transmission is similar.

8. CAUTIONS:
Make sure that the driveshaft is supported with suitable retaining straps.
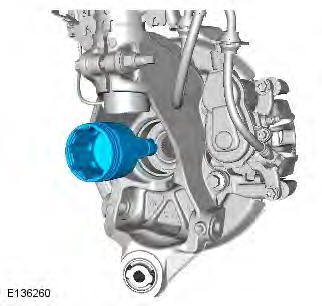
Do not use a hammer to detach the halfshaft from the hub assembly, failure to follow this instruction may result in damage to the halfshaft.
Special Tool(s): 205-857

Vehicles with front wheel drive transmission (FWD)
9. CAUTION: Do not use a hammer to detach the halfshaft from the hub assembly, failure to follow this instruction may result in damage to the halfshaft. Special Tool(s): 205-857

All vehicles
10. CAUTIONS:
Make sure that no load is placed on the brake hose.
Make sure that the brake hose is not twisted and is correctly located. Tie aside with a suitable tie strap.

11.

12.

13.

14.

15. CAUTION: Note the fitted position of the component prior to removal.

16. Special Tool(s): JLR-204-804

Vehicles with dynamic suspension
17.

18.

19. CAUTION: Note the fitted position of the component prior to removal.

20. Special Tool(s): JLR-204-804

21.

All vehicles
22.

23. NOTE: Do not disassemble further if the component is removed for access only. Remove the special tool.

Installation
All vehicles
1. NOTE: This step is only required if previously removed. Install the special tool.

2.

Vehicles with dynamic suspension
3. Remove the special tool.

4. CAUTION: Make sure the component is aligned as shown.

5. Torque: 110 Nm

6.

7.

All vehicles
8. Remove the special tool.

9. CAUTION: Make sure the component is aligned as shown.

10. Torque: 110 Nm

11.

12.

13.

14. CAUTION: Make sure that the brake hose is not twisted and is correctly located. Torque: 110 Nm

15.

Vehicles with front wheel drive transmission (FWD)
16.
All vehicles
17. NOTE: All wheel drive transmission illustrations shown, front wheel drive transmission is similar. Torque: 175 Nm

18. Torque: 270 Nm

19. NOTE: All wheel drive transmission illustrations shown, front wheel drive transmission is similar.

20. WARNING: Make sure that a new nut is installed.
CAUTIONS:
Install the halfshaft nut finger tight.
Do not use air tools to install the nut. Failure to follow this instruction may result in damage to the component.
Tighten the nut without the weight of the vehicle on the suspension.
Torque:
Stage 1: 100 Nm Nm
Stage 2: 90
READ NEXT:
 Rear Shock Absorber Vehicles Without: Dynamic
Suspension
Rear Shock Absorber Vehicles Without: Dynamic
Suspension
General Equipment
Suspension Spring Compressor
Vise
Removal
WARNINGS:
Make sure the spring compressor Safe Working Load (SWL) meets or exceeds
the spring rating quoted in the
Specifcations sectio
Shock Absorber and Spring Assembly Vehicles Without:
Dynamic Suspension
Special Tool(s)
JLR-204-804
Lever, Wheel Knuckle
General Equipment
Transmission jack
Wooden Block
CAUTIONS:
Nuts and bolts must be tightened with the weight of the vehicle on the
suspension.
LH
Wheel Knuckle Rear Bushing
Special Tool(s)
204-620-01
Installer, Wheel Knuckle Bushing
204-620-02
Remover/Installer, Wheel Knuckle Bushing
204-620-03
Remover, Wheel Knuckle Bushing
LR-121
Hydraulic Cylinder 10t
Removal
1. WARNI
SEE MORE:
Checking the tyre pressure after a repair
When driving the vehicle, if
you
experience vibrations, abnormal
steering, or noises, reduce speed
immediately. Drive with extreme
caution and reduced speed to the first
safe place to stop the vehicle. Visually
examine the tyre, and check its
pressure. If there are any signs of
damage or
Replacement sensor
Should the sensor require replacing, it should
be carried out by a Dealer/Authorised Repairer.
A replacement sensor must be fitted to a
running wheel in order to be recognised by the
system. The vehicle needs to be stationary for
15 minutes during the sensor fitment before
the system is ready
