Range Rover Evoque: Front Inner Quarter Panel
Removal
NOTES:
The front inner quarter panel is manufactured from mild steel.
The front inner quarter panel is to be unpicked from the inner quarter panel, it is not serviced separately.
There are NVH components on this panel, they are not serviced on the new panel. If damaged, new components will be required.
1. The front inner quarter panel is replaced in conjunction with:
- Rear bumper cover
- Quarter panel
- Rear door
- Quarter glass

2. For additional information relating to this repair procedure please see the following: For additional information, refer to: Health and Safety Precautions (100-00 General Information, Description and Operation) / Body Repairs (501-25A Body Repairs - General Information, Description and Operation) / Corrosion Protection (501-25B Body Repairs - Corrosion Protection, Description and Operation) / Body and Frame (501-26 Body Repairs - Vehicle Specific Information and Tolerance Checks, Description and Operation) / Standard Workshop Practices (100-00 General Information, Description and Operation).
3. NOTE: You will need to use the rocker panel butt joint location in option 2 of the quarter panel procedure, to gain access to install the front inner quarter panel. Remove the quarter panel.
For additional information, refer to: Quarter Panel (501-30B Rear End Sheet Metal Repairs - 5-Door, Removal and Installation).
4.

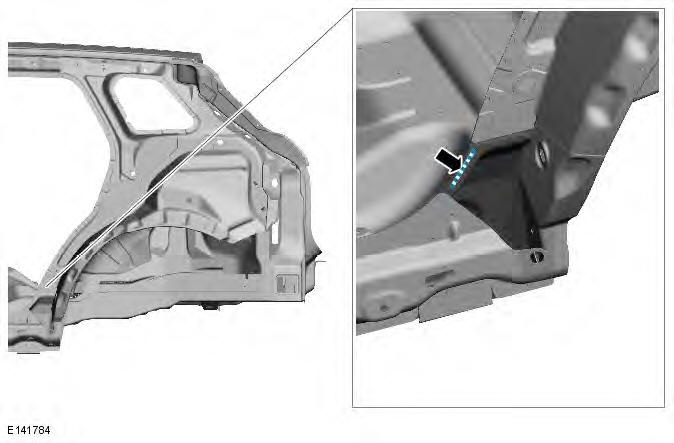
5. Drill out the spot welds.

6. Separate the joints and remove the old panel, also releasing the NVH component.
Installation
1. Drill out the spot welds on the new front inner quarter panel as indicated.

2. Separate the joints and remove the front inner quarter panel from the inner quarter panel.
3.

4. Prepare the old and new panel joint surfaces, including NVH component.
5. NOTE: With panel in position check for access to spot weld the joints. Offer up the new panel and clamp into position. Check alignment, if correct, proceed to next step, if not, rectify and recheck before proceeding.
6.

7. Remove the new panel.
8.
9. Apply sealer adhesive to the NVH component and install to the new panel.
10. Offer up the new panel and clamp into position. Check alignment, if correct, proceed to next step, if not, rectify and recheck before proceeding.
11. Tack MIG weld the butt joint.
12. NOTES:
Spot welding is completed when the quarter panel is installed.
Joints with new panel bonding adhesive in them must be fully spot welded on installation
Spot weld.

13. MIG weld the butt joint.

14. MIG plug weld.

15. Dress the MIG welds.
16. Apply a zinc rich primer to any bare metal surfaces at this stage.
17. The installation of associated panels and mechanical components is the reverse of removal.
READ NEXT:
 Rear Inner Quarter Panel
Removal
NOTES:
The rear inner quarter panel is manufactured from mild steel.
The rear inner quarter panel is unpicked from the inner quarter panel, it is not
serviced separately.
There are NVH comp
Inner Quarter Panel and Wheelhouse
Removal
NOTES:
The inner quarter panel and wheelhouse is manufactured from mild steel.
The aid of a second technician is required to remove, offer up and align the
inner quarter panel and wheelhouse
Inner Back Panel Assembly
Removal
NOTES:
The inner back panel assembly is manufactured from mild steel.
The panel is serviced less its weld studs.
The new service panel is not fully spot welded when supplied.
It is necessar
SEE MORE:
Front Inner Parking Aid Sensor
Removal
CAUTION: LH illustration shown, RH is similar.
NOTES:
Removal steps in this procedure may contain installation details.
The ignition must be switched off.
1. WARNING: Make sure to support the vehicle with axle stands.
Raise and support the vehicle.
2. Refer to: Front Bumper Cover (501-19 B
Electronic Engine Controls -
Component Location
Component Location
COMPONENT LOCATION - SHEET 1 OF 4
Fuel metering valve - HP Fuel pump
Camshaft Position (CMP) sensor (2 off)
Variable Camshaft Timing (VCT) solenoid (2 off)
Purge valve
Generator
Air Conditioning (A/C) compressor clutch
Crankshaft Position (CKP) sensor
Turbocharger wasteg
